Have you ever tried making homemade sushi for the first time but forgot to purchase a rolling mat?
Don’t worry – no special tools and supplies are required to roll your sushi perfectly. This page will teach you how to roll sushi without a mat in just seven simple steps!
Can you roll sushi without a mat?
Yes, rolling sushi without a mat is possible. You can enjoy your sushi happily without the need for rolling mats or bamboo mats.
We have seven easy steps on this page to help you out. The bonus is we have another option you can try to roll your sushi without a sushi mat! The following section on this page will tell you what you need to get started with the rolling.
What you need
There’s no need to worry – you can quickly find these supplies and ingredients at home!
Here’s what you should prepare:
For wrapping:
- A hand towel or dish. Your hand towel should be lint-free. Lint in hand towels can stick to your roll.
- Plastic wrap. A plastic wrap will be used to top your hand towel.
For the sushi roll
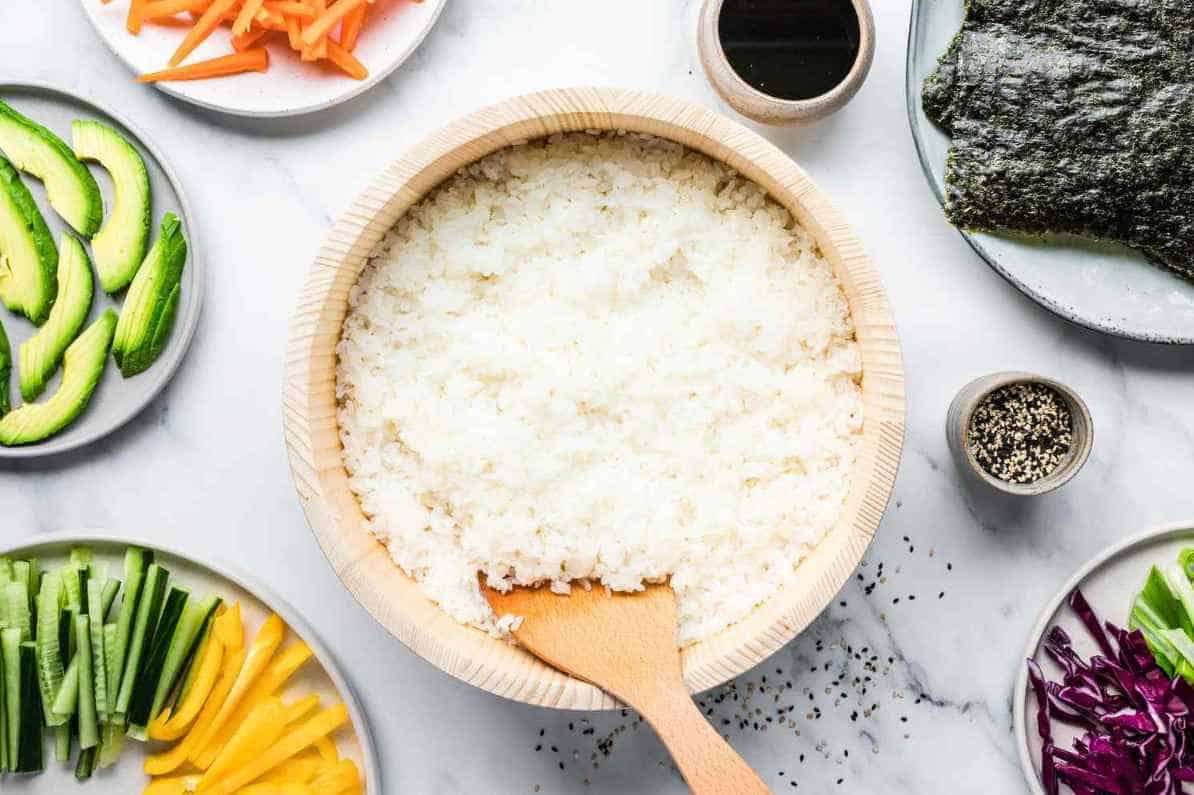
- Sushi rice. You can also use different sushi rice options, like medium-grain white rice, short-grain white rice, or brown rice.
To make sushi rice, use the following:
- 2 cups of water
- 3 tbsp rice vinegar
- 2 tbsp sugar
- ½ tsp salt
- Nori or dried seaweed sheets
- Your sushi filling depends on the type of sushi you will make. You can prepare avocado, cucumber, bell pepper, fish, etc.)
- You can choose soy sauce, pickled ginger, or wasabi to make your sushi tastier.
How do you roll sushi without a mat?
It’s quick, easy, and straightforward.
Here are seven easy steps you can do how to roll sushi without a mat:
Step 1: Cook sushi rice
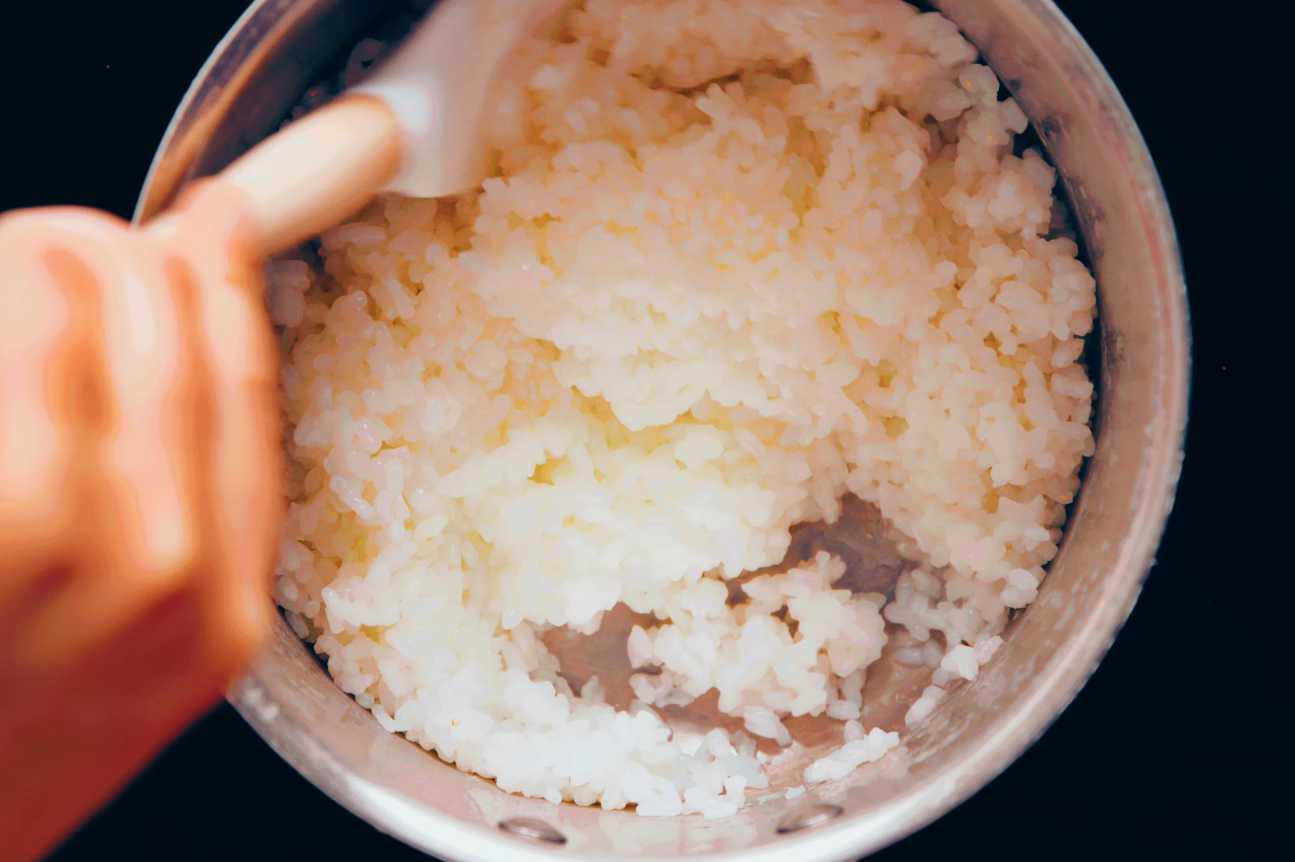
To create a perfectly rolled sushi, the first step is preparing the sushi rice. One cup, about 158 grams, is usually enough. Start by rinsing the rice under water and strain it to remove impurities.
After rinsing the rice, bring it to a boil in a covered pot. Once cooked and steamed for about 15 to 20 minutes, your rice should be ready.
Cooked sushi rice should be sticky after the water has cooked off. Luckily, there’s an even quicker option to have sushi rice. Sushi rice is available in Asian markets and stores.
There are also sushi rice cookers for the perfect sticky sushi rice in stores.
Step 2: Prepare your fillings
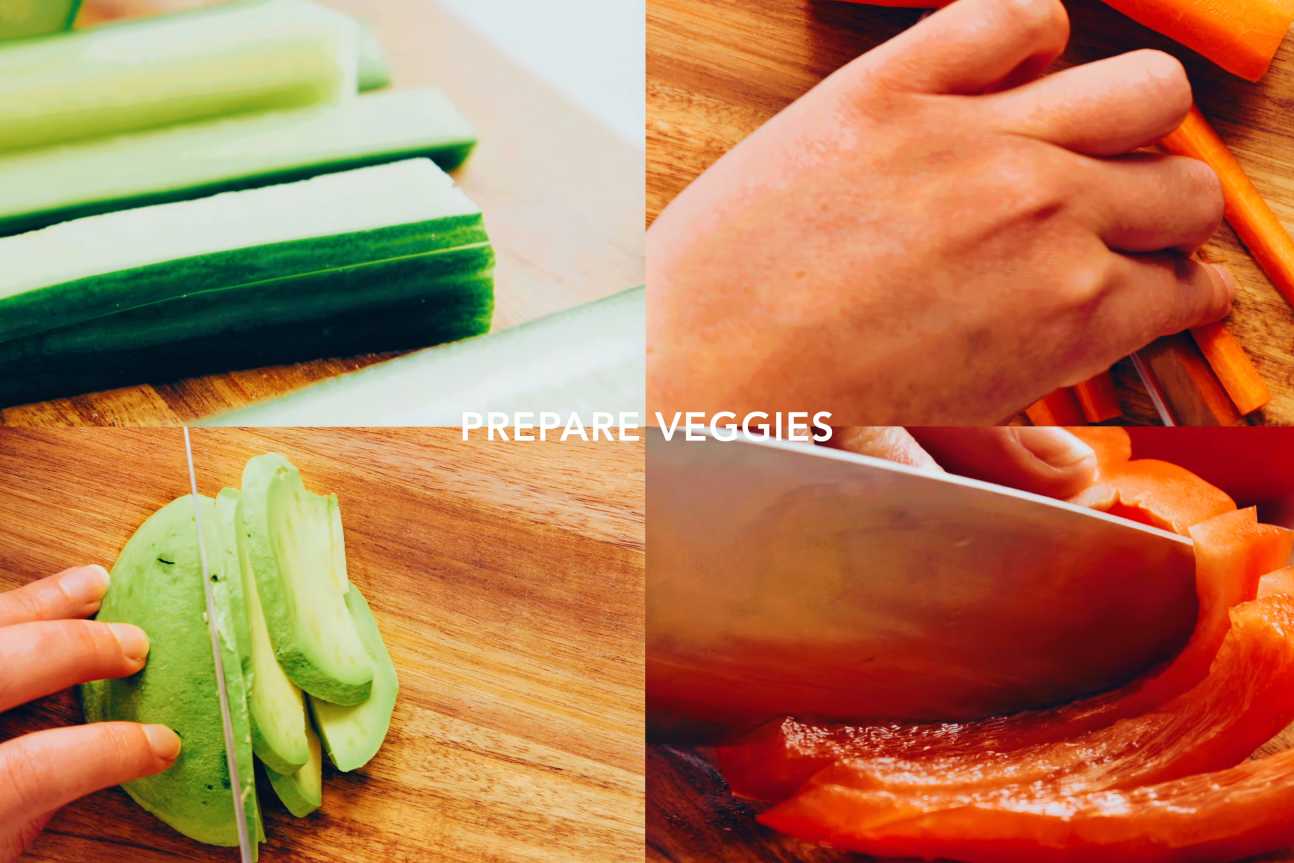
Cut all vegetables into thin slices if you’re making vegetarian or vegan sushi. Vegetables you can include in your sushi rolls are cucumbers, carrots, bell peppers, and avocados.
Cut the vegetables to no longer than 2 to 3 inches or 5 to 7.5 inches. Having thin slices of vegetables will allow you to layer the fillings on top of one another. You get to savor every flavor inside your sushi with each bite.
If you’re going to make sushi with meat, you should also cut your meat fillings thinly on a cutting board. Remember to use a sharp knife to cut them thin. Follow the same length as vegetables, with no slice more than 2 to 3 inches.
The types of meat you can use are shrimp, crabmeat, ham, and salmon. Just make sure to produce thin cuts to layer the fillings atop each other easily.
Step 3: Set up your DIY mat

Choose a thick, lint-free towel to give enough support when rolling your sushi. Lay your hand towel or dish on a flat surface. A flat, even surface will serve as your base for rolling your sushi.
Make sure that your towel or dish is a couple of inches wider than your seaweed wrap on all sides.
The standard size of nori is 8 by 8 inches or 20 by 20 cm. Having a larger towel gives enough space for you to roll your sushi and support the roll.
After setting your mat, don’t forget to lay a piece of plastic over the towel. The plastic wrap will act as a barrier between the sushi and your hand towel so that the fabric won’t stick to your roll.
The plastic sheet should be the same size as your hand towel.
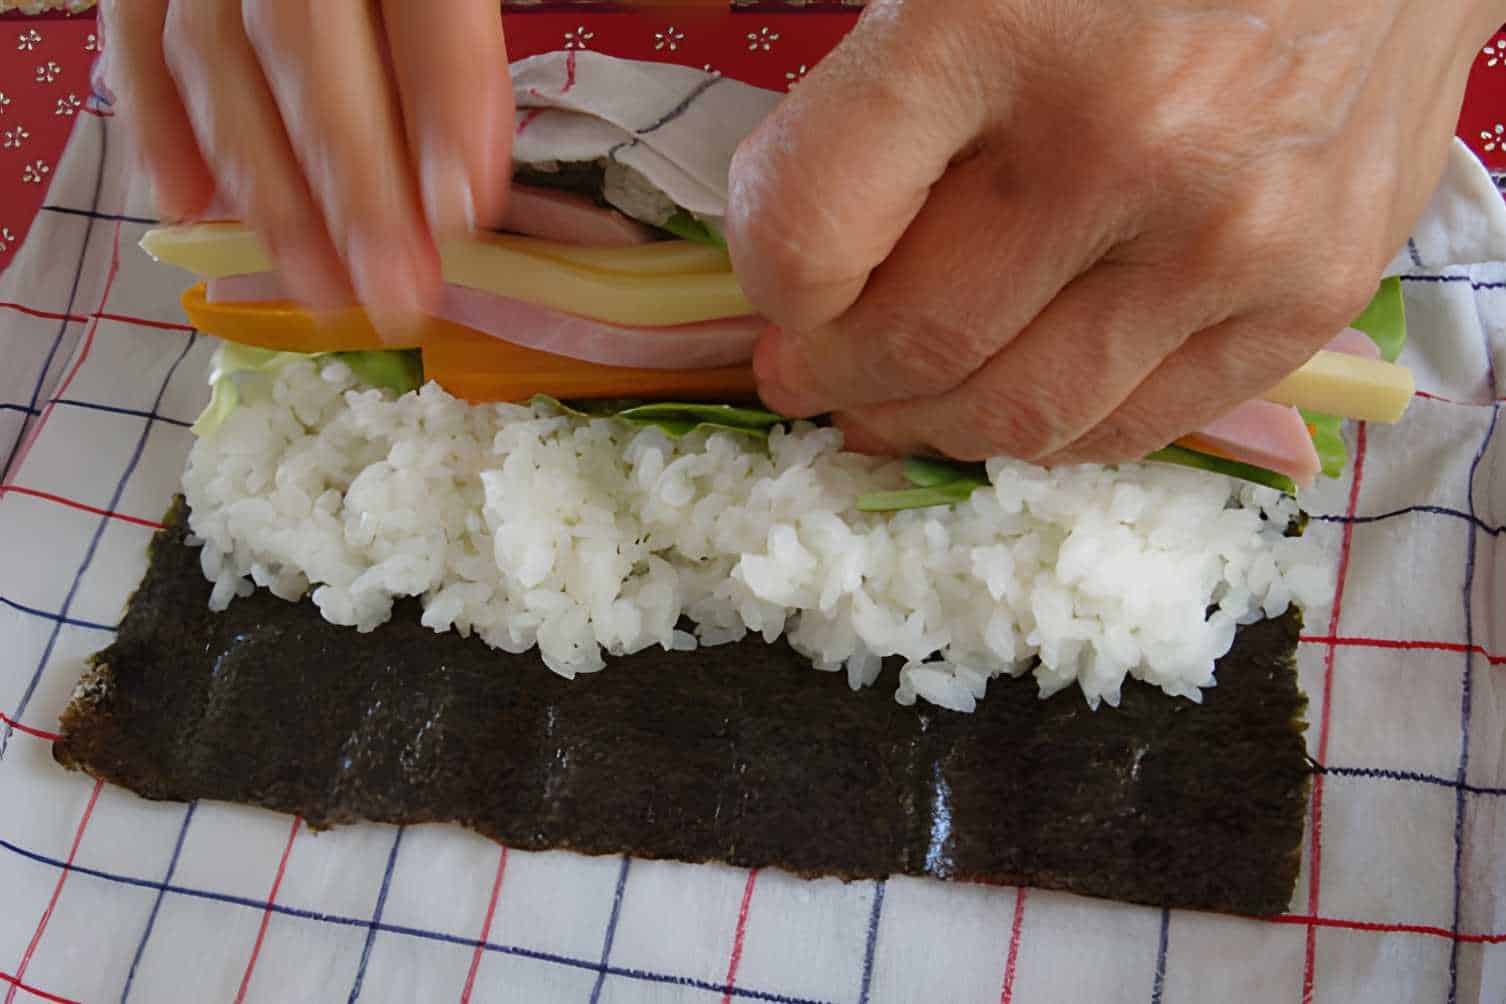
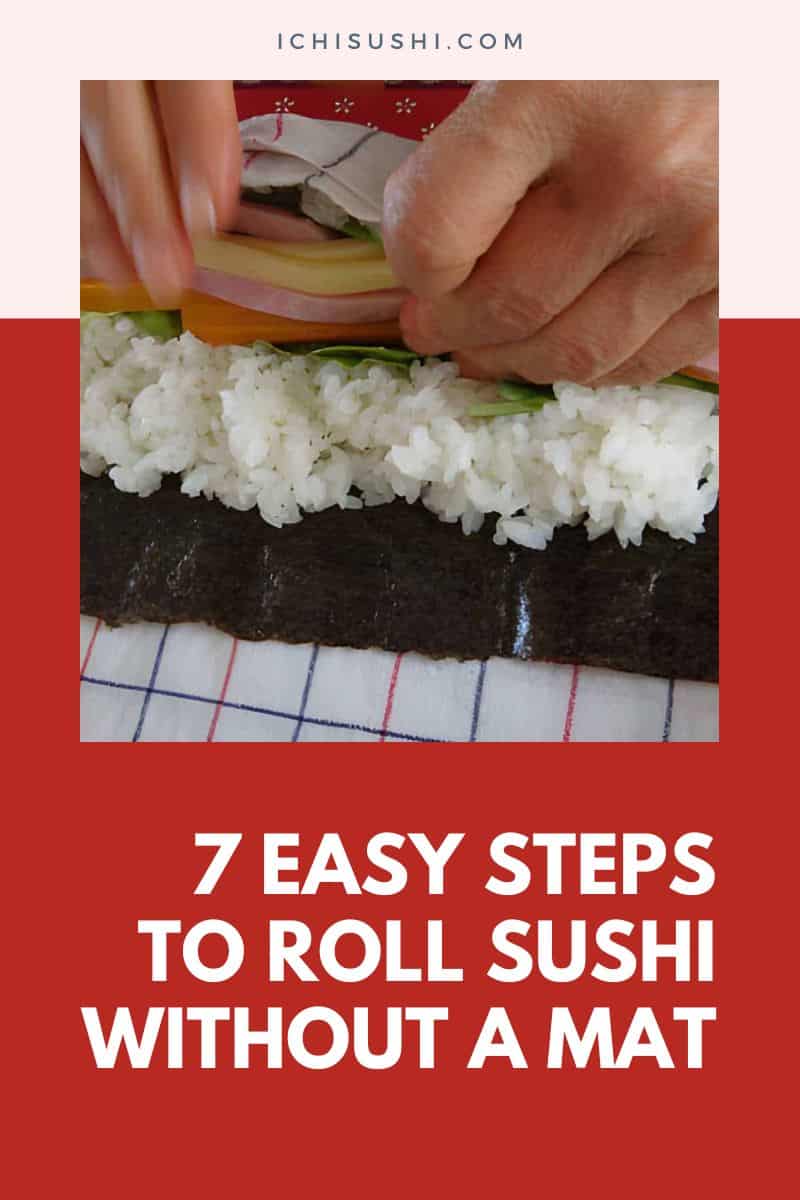
Step 4: Add all ingredients
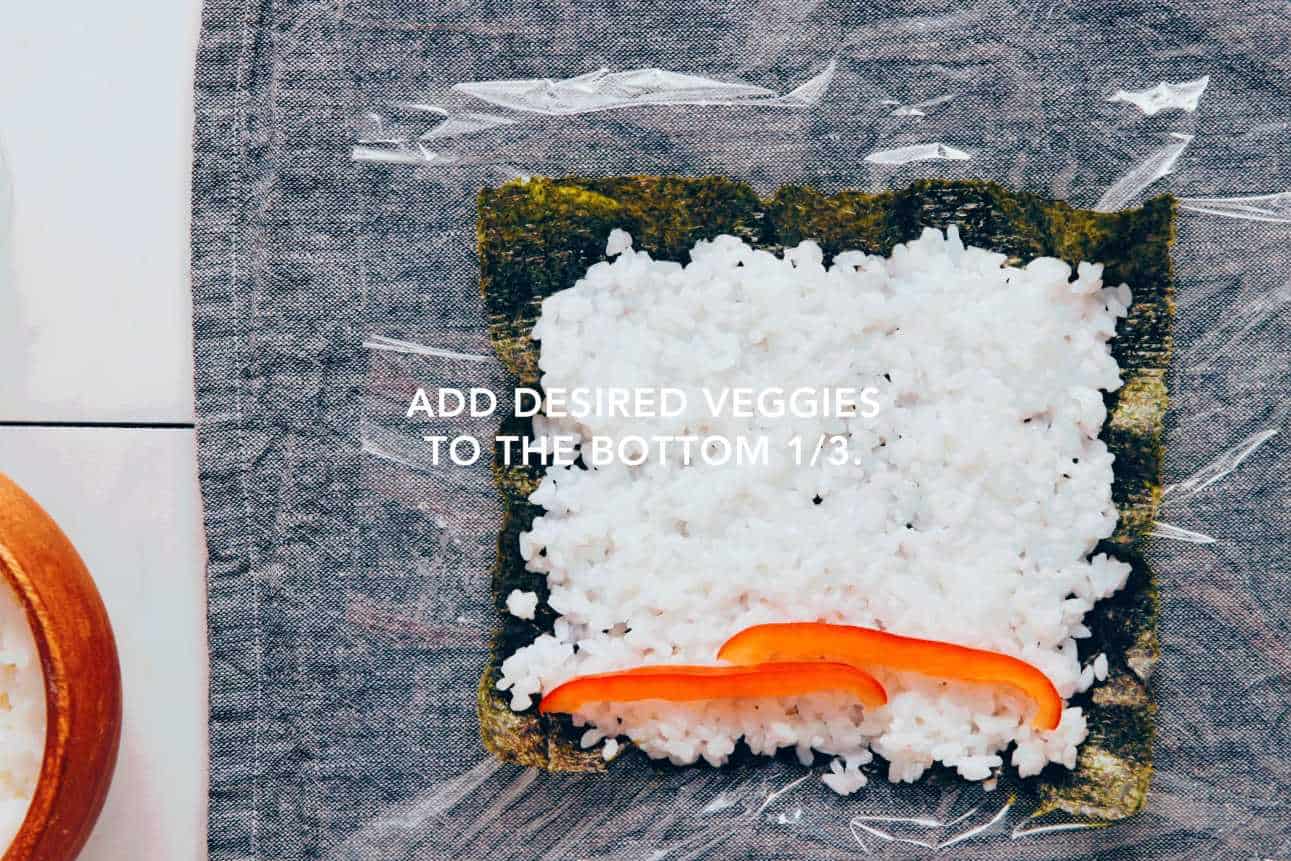
Once you’ve set up your DIY sushi mat, it’s time to layer all ingredients. Place the seaweed wrap on the center of the mat. Adjust the towel and plastic sheet, so the seaweed wrap fits well.
Scoop sushi rice and place it over the nori. You can use your wet fingers and palms to spread the layer of rice. Wetting your fingers and palm will prevent the rice from sticking to your hands.
Keep the layer thin so you can still add and fill the nori with ingredients. The sushi rice should cover the entire sheet of dried seaweed wrap.
Now, you can add all the ingredients to complete your sushi. Line your fillings across the nori, about an inch away from the edge. You can use a spoon to guide you as you fill the roll.
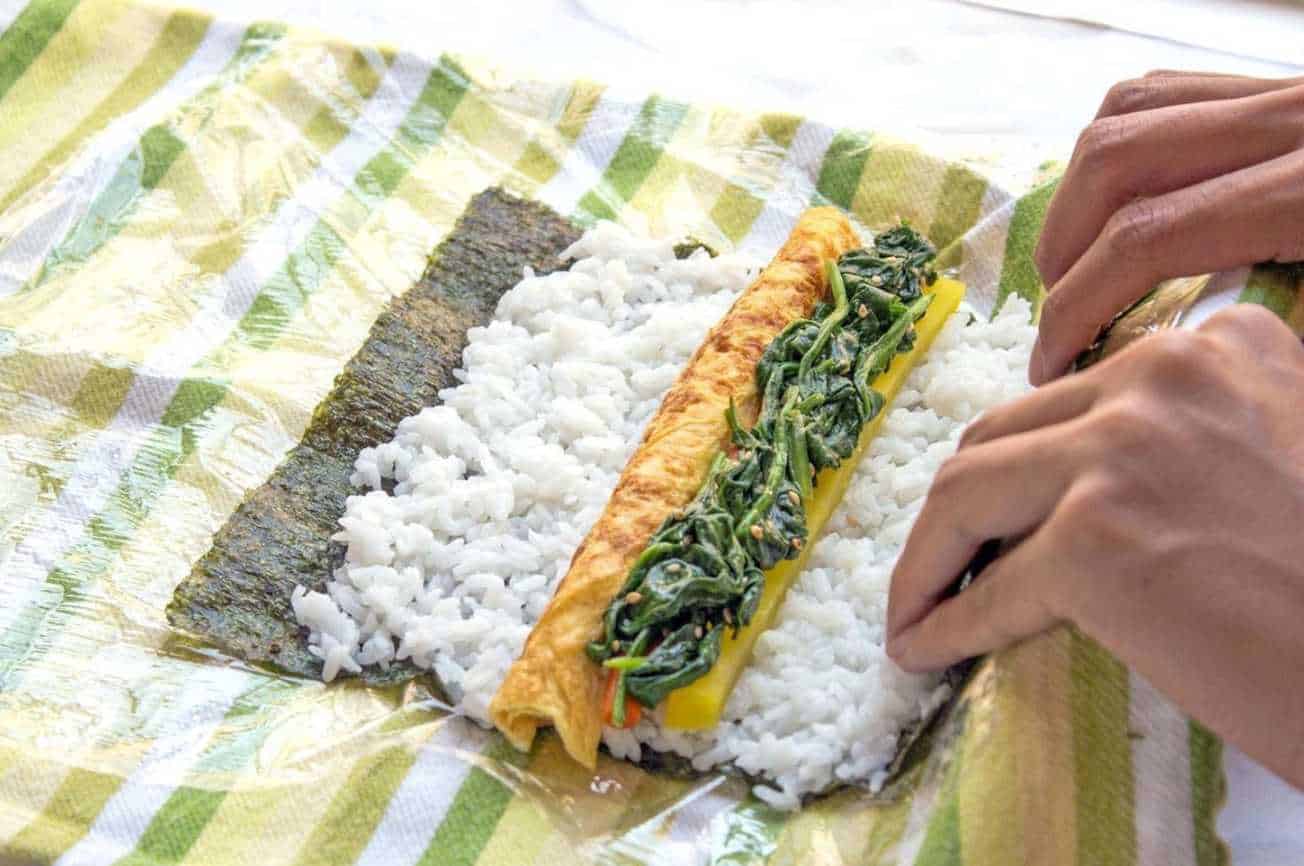
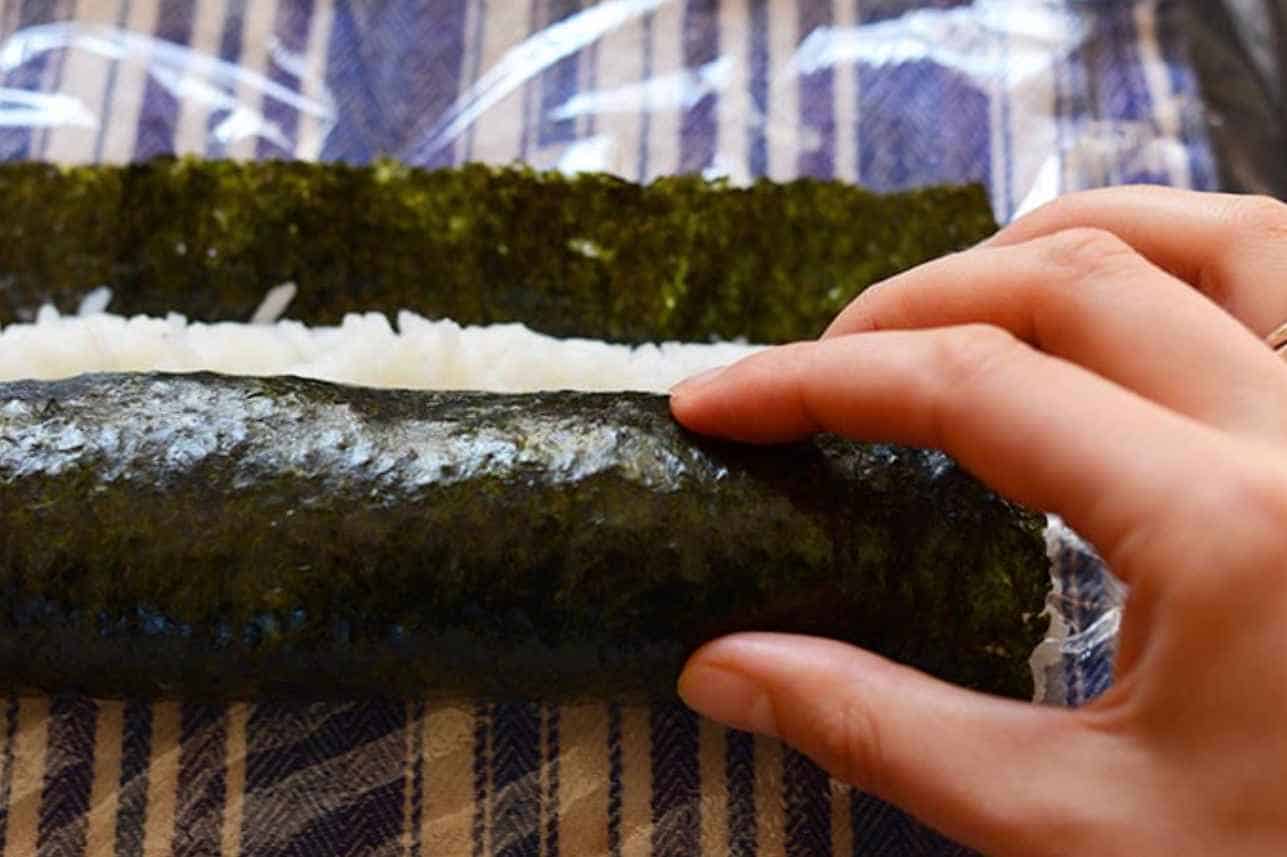
Step 5: Carefully roll the sushi
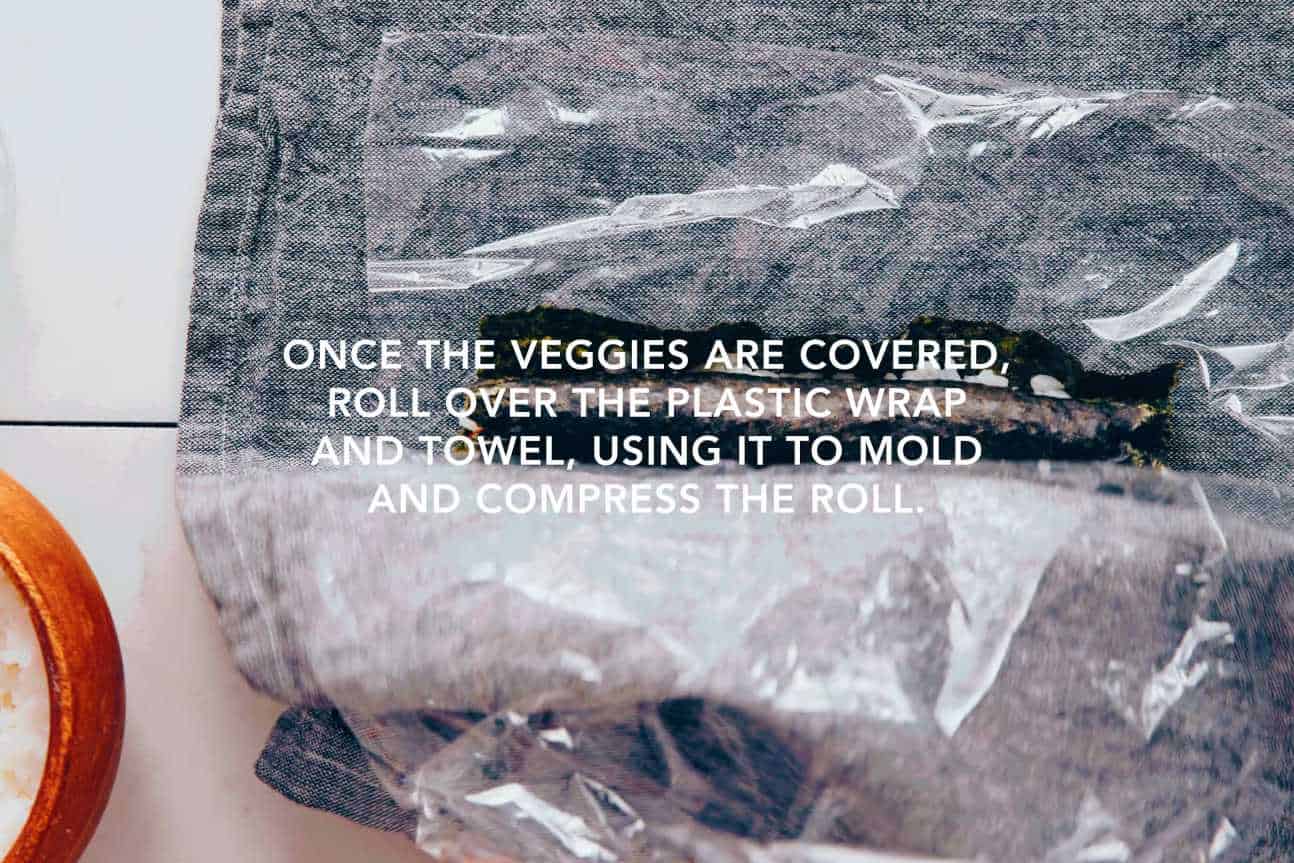
After you are satisfied with all the ingredients, you can now roll the sushi. Use the paper to leverage your sushi and guide as you move it.
Use your hands to roll the sushi tightly and secure the edges of your wrap. To ensure that your sushi is wrapped tightly, you should put pressure on the roll.
Step 6: Cut your sushi into 6 to 8 rolls
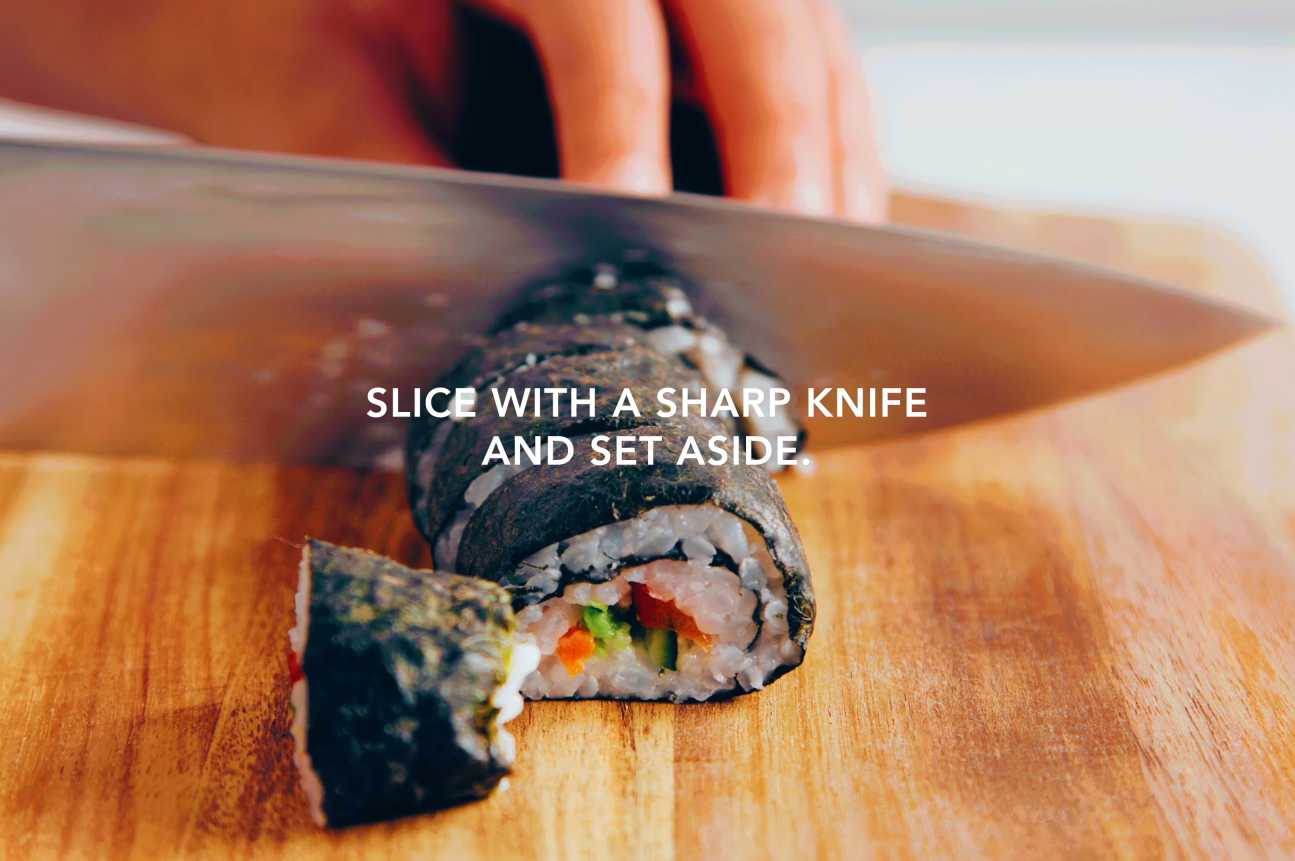
If you need to cut the roll into pieces, you should only use a sharp knife. Cut your sushi using a sharp knife and let its weight press through the roll.
Do not try sawing the sushi or using a dull knife. Sawing will cause the sushi rice to get knocked off or your nori to tear.
Step 7: Enjoy your sushi
And you’re done! You’ve successfully rolled your sushi following our guide on how to roll sushi without a mat. Your roll is ready to be served, and you can not enjoy your sushi.
How to roll sushi without a plastic sheet?
If you don’t like to use a plastic sheet, parchment paper is another excellent option for rolling sushi.
First, cut an adequate-sized sheet of parchment paper. Make sure it’s a few inches bigger than the seaweed wrap on all sides.
Second, prepare all ingredients and cook your sushi rice. Then, lay a sheet of seaweed wrap on the parchment paper. Get a spoonful of sushi rice and place them over the wrap.
You can use your fingers to spread the rice in. Add ingredients and stack them atop one another as desired.
After ensuring that all ingredients and fillings are in place, use the parchment paper to lift the sushi roll. Roll the nori tightly into a wrap and seal the edges with your damp or wet fingertips.
You may put pressure on the roll to ensure that it is wrapped tightly. To cut the sushi, use a sharp knife. Never use a dull knife, as this can disintegrate your sushi roll.
What is the best way of ruling sushi without a sushi mat?
The best way to roll sushi without a mat is to use a lint-free, clean hand towel with a plastic sheet on top. This DIY sushi mat is an excellent technique to roll your sushi perfectly.
Here are the best tips to successfully roll your sushi without a mat:
- Use a lint-free towel. Using a lint-free towel to keep your sushi from getting fabric on its wrap is very important.
- Have a DIY sushi mat bigger than your seaweed wrap. Only roll your sushi on a DIY mat that’s bigger than your nori on the top, bottom, and sides. Choosing a smaller mat can be troublesome for you, and your rice and fillings may get knocked off.
- Slice your fillings thinly, with no filling longer than 2 to 3 inches. If your slices are too thick, it will be hard to layer them across the roll.
- Never use a dull knife when cutting your sushi. Do not use a sawing motion on the roll when slicing. Just let the knife put its weight on the roll.
And to complete your sushi, it’s best to serve it with toppings and dipping sauces like soy sauce, pickled ginger, and also wasabi.
Summary
Those are seven quick and easy steps on how to roll sushi without a mat! These steps are straightforward, and the best thing about the technique is that no special supplies are needed.
With a clean hand towel and a sheet of plastic, you’re good to let your sushi roll!

Hiroshi Nakamura, a Tokyo-born sushi chef turned US-based writer and critic, is the voice behind ichisushi.com, blending traditional sushi wisdom with modern insights.